#Networking
Every module gets an isolated network shared by its VMs. By default, the build creates a single VPC with one subnet and internet access, which is fine for most cases. Declare extra network structure only when you need something more.
A network has three layers:
- VPCs isolate one network from another. Two VPCs cannot reach each other unless you bridge them. Internet access is a per-VPC setting.
- Subnets live inside a VPC. A subnet has a CIDR (when managed) and a DHCP setting.
- NICs live on a VM and attach the VM to a subnet. Each NIC pins to a PCI slot (1–9) and can also carry a static IP, MAC, and model.
#In the editor
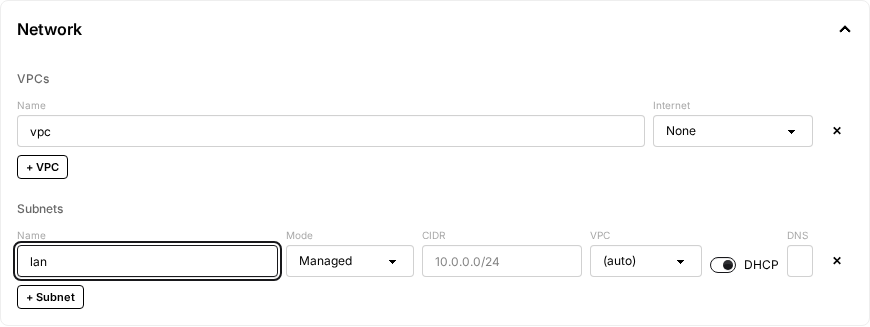
There are two places to look:
- The top-level Network section lists the module's VPCs and Subnets. Click + VPC or + Subnet to add one.
- On a VPC, Internet is
None,Build only, orAlways.Build onlygives the build phase internet (forapt, downloads, package installs) but isolates clones from the public internet.Alwaysleaves internet on for both build and clones. - On a subnet, Mode is
ManagedorUnmanaged. Every subnet needs a CIDR and may name a VPC. Only DHCP and DNS are managed-only, since an unmanaged segment is served by a guest (see Managed vs unmanaged subnets below).
- On a VPC, Internet is
- Inside each VM, the Network Interfaces section lists the VM's NICs. Each NIC has a Slot (1–9 PCI slot), a Subnet (a dropdown of the subnets you declared), and optional IP, MAC, and Model. Click + NIC to add one; the editor picks the lowest free slot. Up to nine NICs per VM.
#Defaults (no network configured)
If you leave the Network section empty, the build creates a single VPC, a single subnet, and internet access. Every VM gets one NIC connected to that subnet via DHCP.
#One subnet, custom CIDR
network:
    subnets:
        - name: lan
          cidr: '10.0.0.0/24'
vms:
    - name: builder
      # ...
      nics:
          - name: nic1
            slot: 1
            subnet: lan
            ip: '10.0.0.10'
If you specify any nics, list them all. There is no "automatic NIC" once you start declaring them.
#Multiple subnets in one VPC
network:
    subnets:
        - name: mgmt
          cidr: '10.0.0.0/24'
          dns: '8.8.8.8,1.1.1.1'
        - name: data
          cidr: '10.0.1.0/24'
          dhcp: false
vms:
    - name: multi-nic
      nics:
          - name: nic1
            slot: 1
            subnet: mgmt
          - name: nic2
            slot: 2
            subnet: data
            ip: '10.0.1.50'
            mac: '52:54:00:ab:cd:ef'
Any subnet without an explicit vpc ends up in the auto-created VPC.
#Multiple VPCs
Two VPCs are isolated from each other unless you bridge them. Useful for modeling a public/private split.
network:
    vpcs:
        - name: public
          internet: true
        - name: private
          internet: false
    subnets:
        - name: pub-subnet
          vpc: public
          cidr: '10.0.0.0/24'
        - name: priv-subnet
          vpc: private
          cidr: '10.0.1.0/24'
vms:
    - name: web
      nics:
          - name: nic1
            slot: 1
            subnet: pub-subnet
            ip: '10.0.0.10'
    - name: db
      nics:
          - name: nic1
            slot: 1
            subnet: priv-subnet
            ip: '10.0.1.10'
#NIC settings
nics:
    - name: nic1 # required schema label; arbitrary but conventionally `nic{slot}`
      slot: 1 # PCI slot 1-9; pins NIC identity across downstream builds
      subnet: lan
      ip: '10.0.0.10' # optional; auto-assigned if omitted on a DHCP subnet
      mac: '52:54:00:...' # optional
      model: 'virtio' # virtio | e1000 (default) | e1000e | rtl8139 | pcnet | ne2k_pci
NIC slot pins the NIC to a specific PCI address on the VM. The same logical NIC then keeps the same PCI address across the base build and every downstream build that reuses the image — so persisted per-adapter state (Windows adapter rename, static IP, DHCP server binding, AD DNS binding) lands on the same interface. The visual editor exposes slot as a 1–9 dropdown; in YAML it is an integer.
name is a required label used internally to key the VMI interface and network entries against each other. It does not control the in-guest interface name or the PCI placement (slot does both, indirectly). The visual editor generates it as nic{slot}; hand-authored YAML can use any DNS-label name.
NIC model matters for OS compatibility:
e1000(default): every modern OS has an in-box driver. Safe for first boots, especially Windows installs before the virtio driver is loaded.virtio: much faster, but the guest must already have thenetkvm/virtio_netdriver. For Windows builds: install the virtio driver first, reboot, then optionally switch.- The others are legacy and rarely needed.
#Managed vs unmanaged subnets
By default, every subnet you declare is managed: the platform runs OVN with IPAM and DHCP, hands out the addresses you assign, and attaches its relay pod so the controller can SSH/WinRM into the VM to run provisioners.
Setting Mode to Unmanaged (or unmanaged: true in YAML) opts a subnet out of most of that. The subnet is still realized as an OVN logical switch, which is what gives it cross-node L2, VPC isolation, and OVS forwarding. What changes is that OVN's DHCP is turned off, NICs attach via the l2bridge binding so nothing else serves DHCP either, and the relay pod is not attached. This is the right choice when something inside a VM needs to serve DHCP itself, for example a Windows DHCP server build, or a router VM that owns its own LAN.
network:
    subnets:
        - name: mgmt
          cidr: '10.0.0.0/24'
        - name: lab
          # The guest gateway takes .1; OVN's own port is relocated to .253.
          cidr: '10.10.0.0/24'
          unmanaged: true
vms:
    - name: dhcp-server
      nics:
          - name: nic1
            slot: 1
            subnet: mgmt # managed: controller reaches us here
          - name: nic2
            slot: 2
            subnet: lab # unmanaged: we serve DHCP on this segment
Constraints to keep in mind:
- Every VM that runs provisioners needs at least one NIC on a managed subnet. The controller drives provisioners over SSH/WinRM through the relay pod, which is only attached to managed subnets. A VM whose NICs are all on unmanaged subnets is unreachable from the controller and the build will hang waiting for the communicator.
cidris still required, andvpcis still honoured. OVN IPAM stays on (every port must have an IP) even though the allocations are inert, so the subnet needs a real CIDR. Declare it equal to the range the guest gateway actually serves, so theovn40subnetsipset entry matches real traffic.- The CIDR must be /29 or wider, and two addresses in it are spoken for. The first usable IP is excluded from allocation so the guest gateway's address is never handed out, and OVN's mandatory gateway router port is relocated to the second-to-last usable IP (
.253in a/24) so it cannot shadow the guest gateway. Keep the guest's DHCP pool clear of that second address. dhcpanddnsare ignored on unmanaged subnets. The guest owns both.- NIC
ipis ignored on unmanaged subnets. The form showsunmanagedin place of the IP field for this reason. Set the address inside the guest instead.
#Internet access
Each VPC has an internet flag. When true, the VPC has NAT egress to the public internet and 8.8.8.8 / 1.1.1.1 DNS. When false, the VPC is fully isolated from the internet (but VMs can still reach each other).
A common pattern is to enable internet during the build (you need to download packages) but disable it on the resulting clones. In the editor, pick Build only on the VPC's Internet dropdown. See Build-only overrides for the YAML form of the same setting.
#Inter-VM communication
VMs in the same module can reach each other over the declared network using the IP addresses you assign. Multi-VM modules are described in Multi-VM builds.